Unlock the Power of AI Chatbots: Build Your Own with Vectorshift
Unlock the Power of AI Chatbots: Build Your Own with Vectorshift. Learn how to create a personalized chatbot using the Vectorshift platform. Discover the step-by-step process to build an AI-powered conversational interface for your website or application.
9 tháng 12, 2025
Unlock the power of AI-driven customer engagement with our easy-to-build website chatbot. Seamlessly integrate it into your website, Slack, WhatsApp, and more, providing your customers with instant access to your knowledge base and personalized responses.
Build an AI Website Chatbot with Vectorshift
Creating a New Pipeline
Using a Knowledge Base
Connecting the Large Language Model (LLM)
Understanding Variables in Vectorshift
Customizing the Chatbot Appearance and Deployment
Testing the Chatbot
Conclusion
Build an AI Website Chatbot with Vectorshift
Build an AI Website Chatbot with Vectorshift
To build an AI website chatbot using the Vectorshift platform, follow these steps:
- Create a new pipeline in Vectorshift.
- Add an input node to represent the user's question.
- Connect the input node to a knowledge base that contains information about your website.
- Add an LLM (Large Language Model) node to generate the chatbot's response based on the user's question and the knowledge base.
- Connect the input node, knowledge base, and chat memory to the LLM node.
- Configure the variables to pass the necessary data between the nodes.
- Customize the appearance and behavior of the chatbot by adjusting the output settings.
- Deploy the chatbot and embed it on your website using the provided JavaScript or iframe code.
- Test the chatbot by asking questions and ensure it provides accurate and relevant responses.
Remember, you can always reach out to the Vectorshift team for any questions or assistance in building your AI website chatbot.
Creating a New Pipeline
Creating a New Pipeline
To create a new pipeline, follow these steps:
- In the Vector Shift platform, click on the "New Pipeline" button to start a new pipeline.
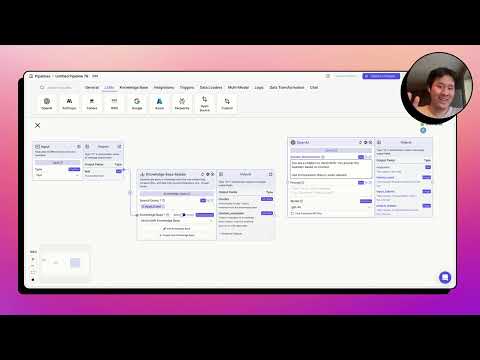
- The pipeline structure consists of an input node, a knowledge base, and a large language model (LLM) node.
- The input node represents the user's question or message, which is then used to query the knowledge base.
- The knowledge base contains the relevant data about Vector Shift, which can be added by scraping the Vector Shift website or manually entering the information.
- The LLM node takes the user's question, the related data from the knowledge base, and the conversation history, and generates an educated response.
- To connect the nodes, use the variable builder to define the variables that will be passed between the nodes, such as the user's message, the knowledge base chunks, and the conversation history.
- Customize the pipeline's appearance and settings, such as the text output format and the display of sources.
- Deploy the pipeline changes and export the chatbot code to embed it on your website or integrate it with other platforms like Slack, WhatsApp, or SMS.
- Test the chatbot by asking it questions about Vector Shift, and make any necessary adjustments to the pipeline.
Using a Knowledge Base
Using a Knowledge Base
The first step in building the chatbot pipeline is to create a knowledge base. In this case, we are creating a "Vector Shift Knowledge Base" that contains information about Vector Shift, the company. This knowledge base can be populated by scraping the Vector Shift website or by manually adding relevant data.
The knowledge base is then connected to the input node of the pipeline, which represents the user's question. The input node queries the knowledge base, and the related data is passed to the large language model (LLM) node.
The LLM node uses the user's question, the related data from the knowledge base, and the conversation history (if available) to formulate an educated response. This response is then passed back to the output, which can be customized to display the text in a more conversational format and include citations for the sources used.
By using a knowledge base, the chatbot can provide accurate and relevant information to the user, drawing from a curated set of data. This approach ensures that the chatbot's responses are grounded in factual information, while the LLM can still leverage the context to generate natural and engaging responses.
Connecting the Large Language Model (LLM)
Connecting the Large Language Model (LLM)
The key component of the chatbot pipeline is the Large Language Model (LLM) node. This node takes in the user's question, the relevant data from the knowledge base, and the conversation history, and generates an educated response.
To connect the LLM node, we first need to prompt it with the desired behavior. In this case, we want the chatbot to answer the question based on the provided context, using the conversation history when relevant.
Next, we need to define the variables that will be passed to the LLM node. These include the user's question ({{input.text}}), the relevant data from the knowledge base ({{knowledge_base.chunks}}), and the conversation history ({{chat_memory}}).
Finally, we can connect the output of the LLM node to the final output of the chatbot pipeline, allowing the generated response to be displayed to the user.
Understanding Variables in Vectorshift
Understanding Variables in Vectorshift
Variables in Vectorshift represent the data that flows between nodes when a pipeline is executed. These variables are defined using double curly braces {{}} and consist of two parts: the node name and the output field.
The node name is found at the top of each node, for example, input_node.text or knowledge_base.chunks. The output field is found in the sidebar of each node, such as text or chunks.
When defining variables, you can use the variable builder to automatically populate the node names and output fields. This ensures that the variables are correctly referenced and the data flows seamlessly between the nodes.
By using variables, you can pass data from one node to another, allowing your pipeline to process the information and generate the desired output. Understanding how to work with variables is crucial for building effective and dynamic pipelines in Vectorshift.
Customizing the Chatbot Appearance and Deployment
Customizing the Chatbot Appearance and Deployment
After building the chatbot pipeline, you can customize the appearance and deployment options to fit your needs. Here are the key steps:
-
Cosmetic Changes: You can modify the visual aspects of the chatbot, such as the background color, font styles, and layout, to match the branding and design of your website or application.
-
Deployment Options: Vector Shift provides various deployment options for your chatbot:
- Embed Code: You can copy the automatically generated JavaScript or iframe code and embed the chatbot directly into your website.
- Integrations: The chatbot can be integrated with other platforms, such as Slack, WhatsApp, and SMS, allowing users to interact with it through those channels.
- API Access: You can access the chatbot programmatically through the Vector Shift API, enabling you to incorporate it into custom applications or workflows.
-
Deployment and Updates: Whenever you make changes to the chatbot pipeline, you need to deploy the updates to ensure the chatbot reflects the latest configuration. Vector Shift makes this process seamless, allowing you to export and deploy the chatbot with a few clicks.
-
Testing and Monitoring: Before deploying the chatbot, you should thoroughly test it to ensure it's functioning as expected. Vector Shift provides tools for testing the chatbot and monitoring its performance once it's live.
By customizing the appearance and leveraging the various deployment options, you can seamlessly integrate the chatbot into your existing platforms and provide a tailored user experience for your customers or users.
Testing the Chatbot
Testing the Chatbot
To test the chatbot, we can simply enter a query into the input field and observe the response. In the example provided, the user asks "What is Vector Shift?".
The chatbot first queries the Vector Shift knowledge base, retrieving relevant information about the company. This data is then passed to the large language model (LLM), which formulates an educated response based on the context provided, including the user's question and any conversation history.
The chatbot's response is then displayed, with the text output formatted in a conversational style. Additionally, any relevant citations or sources are shown to provide transparency and credibility.
Once satisfied with the chatbot's performance, you can further customize its appearance and deployment options. The provided JavaScript and iframe code allow you to easily embed the chatbot on your website, or integrate it with other platforms like Slack, WhatsApp, or SMS.
Conclusion
Conclusion
In this tutorial, we have walked through the process of building a website chatbot using the Vectorshift platform. We created a new pipeline, set up an input node to capture the user's message, connected a knowledge base to provide relevant information, and utilized a large language model (LLM) to generate an educated response based on the context.
We explored the concept of variables in Vectorshift, which represent the data flowing between nodes in the pipeline. By connecting these variables, we were able to pass the user's message, the knowledge base chunks, and the conversation history to the LLM, enabling it to formulate a comprehensive response.
Finally, we customized the appearance of the chatbot, deployed the changes, and tested the functionality by asking a question about Vectorshift. The chatbot seamlessly integrated the information from the knowledge base and the LLM to provide a concise and informative response, complete with citations and sources.
This chatbot can be easily embedded into your website, Slack, WhatsApp, SMS, or accessed via an API, allowing you to enhance your user experience and provide valuable information to your audience.
Câu hỏi thường gặp
Câu hỏi thường gặp

